
安装xorg
目前来说这个比较稳定
sudo pacman -S xorg xorg-xinit xorg-server

精简的

sudo pacman -S xorg-server xorg-xinit xorg-xrandr
xorg-server
	Xorg 显示服务器本身
	基础的输入驱动(键盘、鼠标)
xorg-xinit
	提供 startx 命令
xorg-xrandr
	屏幕分辨率调节工具,以后外接显示器或调整大小都会用到它
然后复制配置文件到当前用户
cp /etc/X11/xinit/xinitrc ~/.xinitrc再修改~/.xinitrc注释掉twm及其之后内容,然后添加exec dwm的图形界面环境
chmod +x ~/.xinitrc
vim ~/.xinitrc
新的优化
sudo pacman -S xorg-server xorg-xinit xorg-xrandr
xorg-server
	Xorg 显示服务器本身
	基础的输入驱动(键盘、鼠标)
xorg-xinit
	提供 startx 命令
xorg-xrandr
	屏幕分辨率调节工具,以后外接显示器或调整大小都会用到它
使用到的软件
sudo pacman -S git        (拉取代码)
sudo pacman -S chromium   (浏览器,启动前记得改/etc/locale.conf为zh_CN)
sudo pacman -S code       (VSCode)
dwm和st
suckless官网,dwm是平铺窗口管理器,st是其默认的终端
git clone https://git.suckless.org/dwm
git clone https://git.suckless.org/st

sudo make clean install
个人调整版本
https://gitee.com/riskfan/dwm-6.8

https://gitee.com/riskfan/dwm-slock在安装xorg后使用startx即可进入DWM环境,但是注意进入后没有dmenu的情况下只能alt shift enter打开终端操作,退出是model + shift + q
如果安装了dmenu(pacman -S dmenu)使用model + p可以搜索应用
如果想在登录后直接进入dwm,可在/etc/profile末尾加startx;
dwm默认快捷键:
退出DWM:mod + shift + q

打开新终端:Alt + Shift + Enter
关闭一个窗口:Alt + Shift + C
窗口横向排列:Alt + D
窗口竖向排列:Alt + I
窗口位置互换:Alt + Enter
在窗口间切换:Alt + J 或 Alt + K
改变窗口的长度/比例:Alt + H 或 Alt + L
平铺模式:Alt + T
单窗口模式:Alt + M
浮动模式:Alt + F
窗口模式切换:Alt + 空格 或 Alt + Shift + 空格
移动窗口:alt + shift + 4 (焦点窗口)

窗口移动:alt 鼠标左键移动
窗口大小:alt 鼠标右键移动
浮动模式的窗口聚焦:alt 鼠标左键点击
st默认快捷键
ctrl shift pgup 放大
ctrl shift pgdn 缩小
dwm和st补丁
将补丁下载到dwm或st代码目录下,使用命令
patch < xxxx权限调整
sudo chown -R youruser:youruser /path/to/folderfcitx5输入法
sudo pacman -S fcitx5-im fcitx5-chinese-addons

sudo vim /etc/environment

加上

GTK_IM_MODULE=fcitx
QT_IM_MODULE=fcitx
XMODIFIERS=@im=fcitx
SDL_IM_MODULE=fcitx
GLFW_IM_MODULE=ibus

开机自启,dwm前
~/.xinitrc
fcitx5 &通过fcitx5-configtool配置
安装中英字体
解压到/home/fan/.local/share/fonts,然后使用fc-cache -fv安装,可以使用fc-list查看已经安装的字体,fc-list :lang=zh列出中文字体
发现也可以直接安装
sudo pacman -S ttf-jetbrains-mono然后自带 Nerd Font
{"JetBrainsMono Nerd Font:size=12"}emoji字体
sudo pacman -S noto-fonts-emojihttps://www.nerdfonts.com/cheat-sheet
安装nvidia驱动
首先确定显卡型号
lspci -k | grep -A 2 -E "(VGA|3D)"然后根据NVIDIA Wiki安装驱动
sudo pacman -S nvidia-open nvidia-utils libva libva-nvidia-driver

sudo pacman -S nvidia-open nvidia-utils nvidia-settings
再执行自动配置
sudo nvidia-xconfig硬件视频加速
sudo vim /etc/profile
在末尾加
# NVIDIA VA-API support
export LIBVA_DRIVER_NAME=nvidia
export VDPAU_DRIVER=nvidia最后sudo reboot重启,然后使用nvidia-smi查看是否安装成功
禁用核显
编辑 /etc/default/grub,在 GRUB_CMDLINE_LINUX_DEFAULT 中加入:

GRUB_CMDLINE_LINUX_DEFAULT="... i915.modeset=0 modprobe.blacklist=i915"

然后更新grub:

sudo grub-mkconfig -o /boot/grub/grub.cfg


3. 创建Xorg配置文件,强制使用NVIDIA显卡
创建 /etc/X11/xorg.conf.d/00-nvidia.conf 文件,这是核心配置:


Section "Device"
    Identifier     "Device0"
    Driver         "nvidia"
    VendorName     "NVIDIA Corporation"
    BusID          "PCI:1:0:0"   # 根据你的lspci输出,你的NVIDIA在01:00.0,所以是1:0:0
    Option         "PrimaryGPU" "yes"
    # 以下选项提升稳定性和性能
    Option         "NVreg_EnableGpuFirmware" "0"  # 对部分笔记本有助于提高稳定性
    Option         "MetaModes" "2560x1600_60"      # 设置你的原生分辨率
    Option         "CoolBits" "28"                  # 启用超频和风扇控制
    Option         "RegistryDwords" "EnableBrightnessControl=1"  # 启用亮度调节
EndSection

Section "Screen"
    Identifier     "Screen0"
    Device         "Device0"
    Monitor        "Monitor0"
    DefaultDepth    24
    SubSection     "Display"
        Depth       24
        Modes      "2560x1600" "1920x1080"
    EndSubSection
EndSection

Section "Monitor"
    Identifier     "Monitor0"
    VendorName     "Unknown"
    ModelName      "Unknown"
    Option         "DPMS"
EndSection

4. 配置显示管理器或 .xinitrc
如果你用 startx 启动,在 ~/.xinitrc 中直接写:

exec dwm

不需要 再添加任何 xrandr 命令,因为Xorg会直接用NVIDIA驱动渲染。

如果你使用显示管理器(SDDM/LightDM等),确保DM启动时没有加载Intel相关的配置。通常你只需要重启,DM会自动使用NVIDIA配置。

5. 重启并验证
重启电脑:

sudo reboot
重启后,验证:

glxinfo | grep "OpenGL renderer"
应该显示类似:

OpenGL renderer: NVIDIA GeForce RTX 3060 Mobile / Max-Q/PCIe/SSE2
再检查内核模块加载情况:

lsmod | grep i915
应该没有任何输出(说明Intel核显已屏蔽)。
分辨率和刷新率
# 查看输出设备
xrandr -q

[fan@Arch ~]$ xrandr -q
Screen 0: minimum 8 x 8, current 2560 x 1600, maximum 32767 x 32767
DP-0 disconnected primary (normal left inverted right x axis y axis)
DP-1 disconnected (normal left inverted right x axis y axis)
HDMI-0 disconnected (normal left inverted right x axis y axis)
DP-2 connected 2560x1600+0+0 (normal left inverted right x axis y axis) 344mm x 215mm
   2560x1600     60.00*+ 165.00

# 选择输出设备
xrandr --output DP-2 --mode 2560x1600 --rate 165.00注意:如需开机启动生效,需要配置到.xinitrc中,最好靠前些
xrandr --output DP-2 --mode 2560x1600 --rate 165.00 &显示比列
创建并编辑vim ~/.Xresources
Xft.dpi: 110触摸板配置
sudo pacman -S xf86-input-synaptics在/usr/share/X11/xorg.conf.d/70-synaptics.conf新增
Section "InputClass"
       Identifier "touchpad"
       Driver "synaptics"
       MatchIsTouchpad "on"
              Option "TapButton1" "1"
              Option "TapButton2" "3"
              Option "TapButton3" "2"
              Option "VertEdgeScroll" "on"
              Option "VertTwoFingerScroll" "on"
              Option "HorizEdgeScroll" "on"
              Option "HorizTwoFingerScroll" "on"
              Option "CircularScrolling" "on"
              Option "CircScrollTrigger" "2"
              Option "EmulateTwoFingerMinZ" "40"
              Option "EmulateTwoFingerMinW" "8"
              Option "FingerLow" "30"
              Option "FingerHigh" "50"
              Option "MaxTapTime" "125"
              Option "VertScrollDelta"          "-200"
              Option "HorizScrollDelta"         "-200"
EndSection注意:粘贴前使用:set paste防止自动换行
声音
经过很久测试,我的笔记本是核显加独显,需要核显进行声音播放才可
检查声卡
lspci -v | grep -i audio

需要包含核显声卡和独显声卡,输出示例:
00:1f.3 Audio device: Intel Corporation Alder Lake PCH-P High Definition Audio Controller
01:00.1 Audio device: NVIDIA Corporation GA106 High Definition Audio Controller
安装基础驱动 (必须,声音工具包、)

sudo pacman -S alsa-utils alsa-firmware sof-firmware

alsa-utils  声音工具包
alsa-firmware  传统声卡固件,支持独显声卡
sof-firmware 专为现代 Intel/AMD 平台的 DSP(数字信号处理器)设计,常见于新式笔记本或主板(如 Intel Skylake 后核显声卡)

加载驱动模块:
sudo modprobe snd_hda_intel  # Intel 声卡

安装 PipeWire
sudo pacman -S pipewire pipewire-alsa pipewire-pulse wireplumber

启用服务:
systemctl --user enable --now pipewire pipewire-pulse

检查状态:
pactl info  # 确认是否运行

此处需要重启才能在下面alsamixer中看见master
查看核显声卡是否已经加载
lsmod | grep snd_hda_intel
检查音频设备列表(确定intel关键字存在)
lspci -k | grep -A 5 Audio

检查声卡状态:
alsamixer  # 按 `F6` 选择声卡,取消静音(MM 表示静音,按 `M` 切换)(音量控制)
选择声卡
列出所有设备,此处确保intel声卡被显示才可以
aplay -l
设置默认声卡(编辑 /etc/asound.conf 或 ~/.asoundrc)
echo 'defaults.pcm.card 1' >> ~/.asoundrc  # 将 1 替换为你的声卡编号  带有sof-hda-dsp

card 1: sofhdadsp [sof-hda-dsp], device 0: HDA Analog (*) []

重启

测试音频
speaker-test -c 2  # 测试立体声
命令查看和控制音量
amixer get Master | awk -F'[][]' '/%/ { print $2 }' | head -n 1  # 音量
amixer set Master 5%+   # 增加 5%
amixer set Master 5%-   # 降低 5%
amixer set Master toggle  # 切换静音

alsamixer  # 图形控制
挂载磁盘
如果是NEFS格式的磁盘需要先下载
sudo pacman -S ntfs-3g然后使用mount /dev/sda1 ~/doc即可临时挂载,重启后失效
想开机有效需要编辑/etc/fstab
/dev/sda1 /home/fan/doc ntfs-3g users,uid=1000,gid=100,fmask=0113,dmask=0002,locale=zh_CN.utf-8 0 0然后可以正常挂载和使用
壁纸
使用feh可以查看图片和设置壁纸
sudo pacman -S feh
feh --bg-scale ~/Downloads/bg.jpg可以设置在~/.xinitrc中启动有效
feh --bg-scale ~/Downloads/bg.jpg &zsh
# 安装zsh
sudo pacman -S zsh
# 初始配置,按0
zsh
# 设置为默认shell,重启
chsh -s /usr/bin/zsh
Oh My Zsh
# 浏览器访问国内地址下载,保存为 install.sh
https://gitee.com/mirrors/oh-my-zsh/raw/master/tools/install.sh
chmod +x install.sh
./install.sh在.zshrc中配置主题,在ohmyzsh查看自己喜欢的主题
ZSH_THEME="cloud"启用插件
# 语法高亮
git clone https://github.com/zsh-users/zsh-syntax-highlighting.git ${ZSH_CUSTOM:-~/.oh-my-zsh/custom}/plugins/zsh-syntax-highlighting
# 自动补全
git clone https://github.com/zsh-users/zsh-autosuggestions ${ZSH_CUSTOM:-~/.oh-my-zsh/custom}/plugins/zsh-autosuggestions
# 然后在 ~/.zshrc 中启用
plugins=(git zsh-syntax-highlighting zsh-autosuggestions)
# 刷新配置
source ~/.zshrc调整提示差距的颜色,在.zshrc中加上
ZSH_AUTOSUGGEST_HIGHLIGHT_STYLE="fg=#8A8A72"ranger
终端下的文件管理器,sudo pacman -S ranger,直接使用ranger即可
生成配置文件
ranger --copy-config=all位于~/.config/ranger/rc.conf
设置显示隐藏文件和图片
set show_hidden true
set preview_images true
set preview_images_method w3m图片的显示需要安装w3m
设置边框
set draw_borders both设置图标
git clone https://github.com/alexanderjeurissen/ranger_devicons ~/.config/ranger/plugins/ranger_devicons
echo "default_linemode devicons" >> $HOME/.config/ranger/rc.conf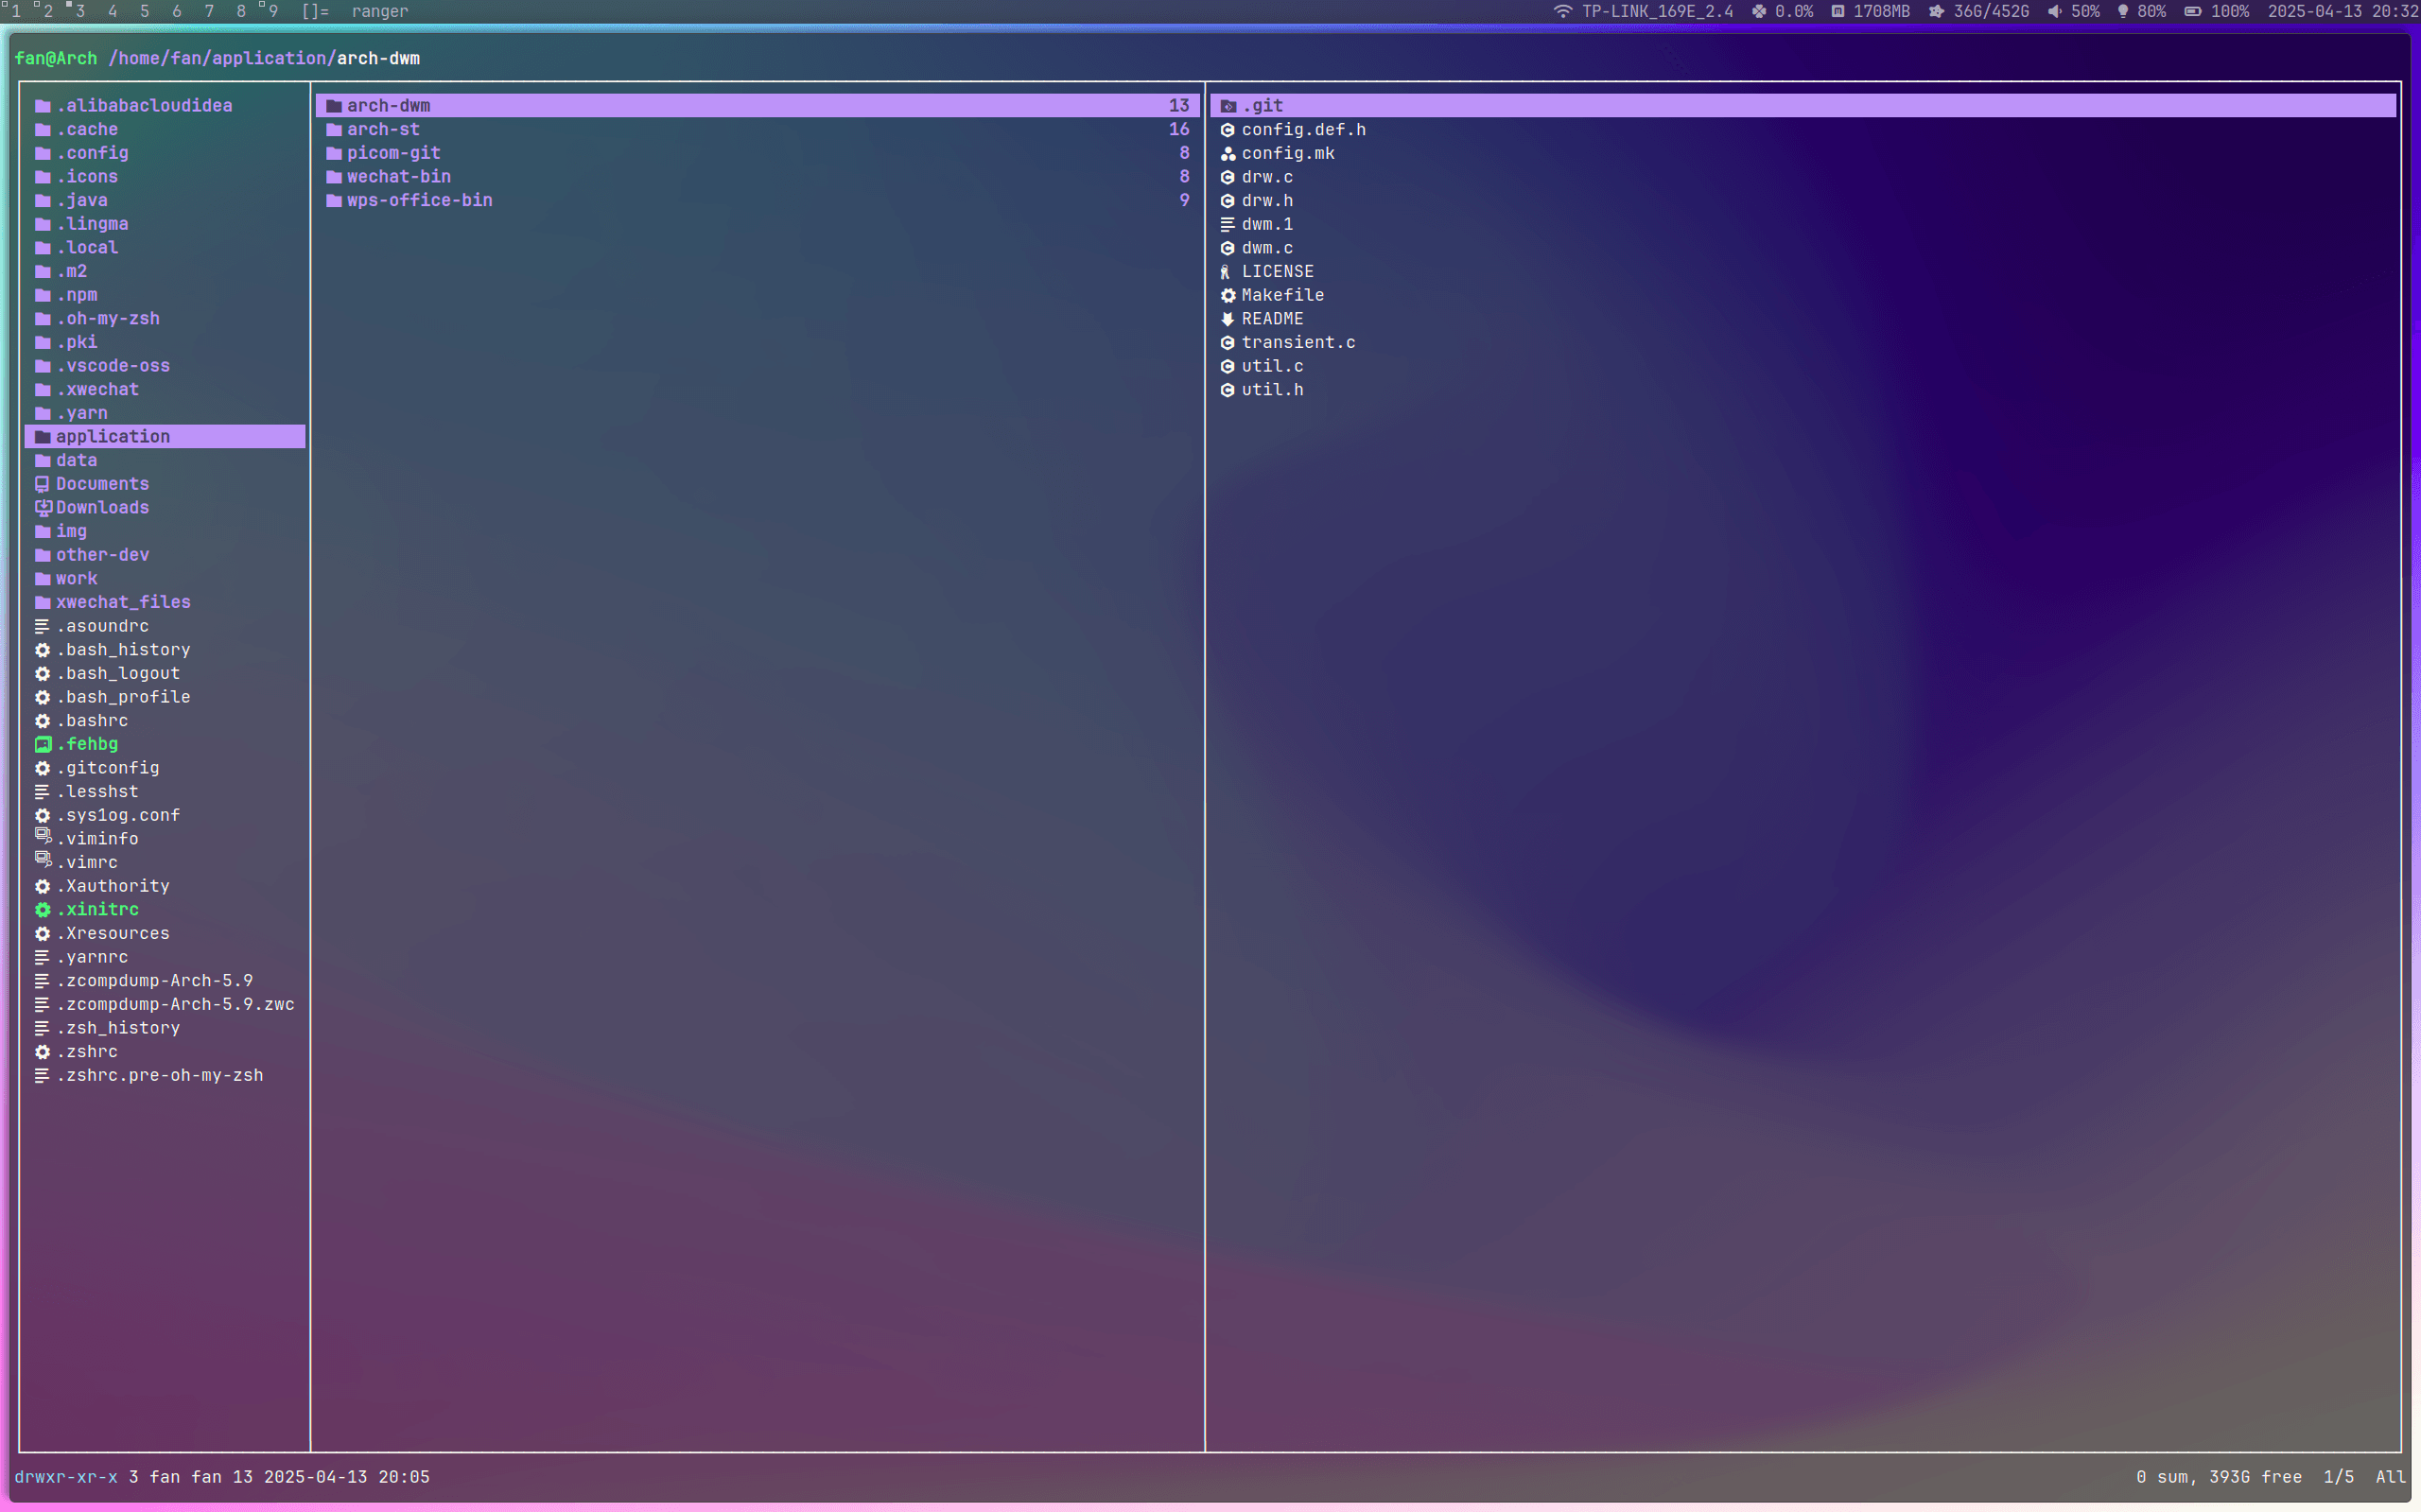
如果使用的kitty,可以直接查看图片,不用安装w3m
sudo pacman -S python-pillow
set preview_images_method kitty
图片复制
sudo pacman -S xclip

map <C-c> shell xclip -selection clipboard -target image/png %f

即可使用 ctrl c 复制图片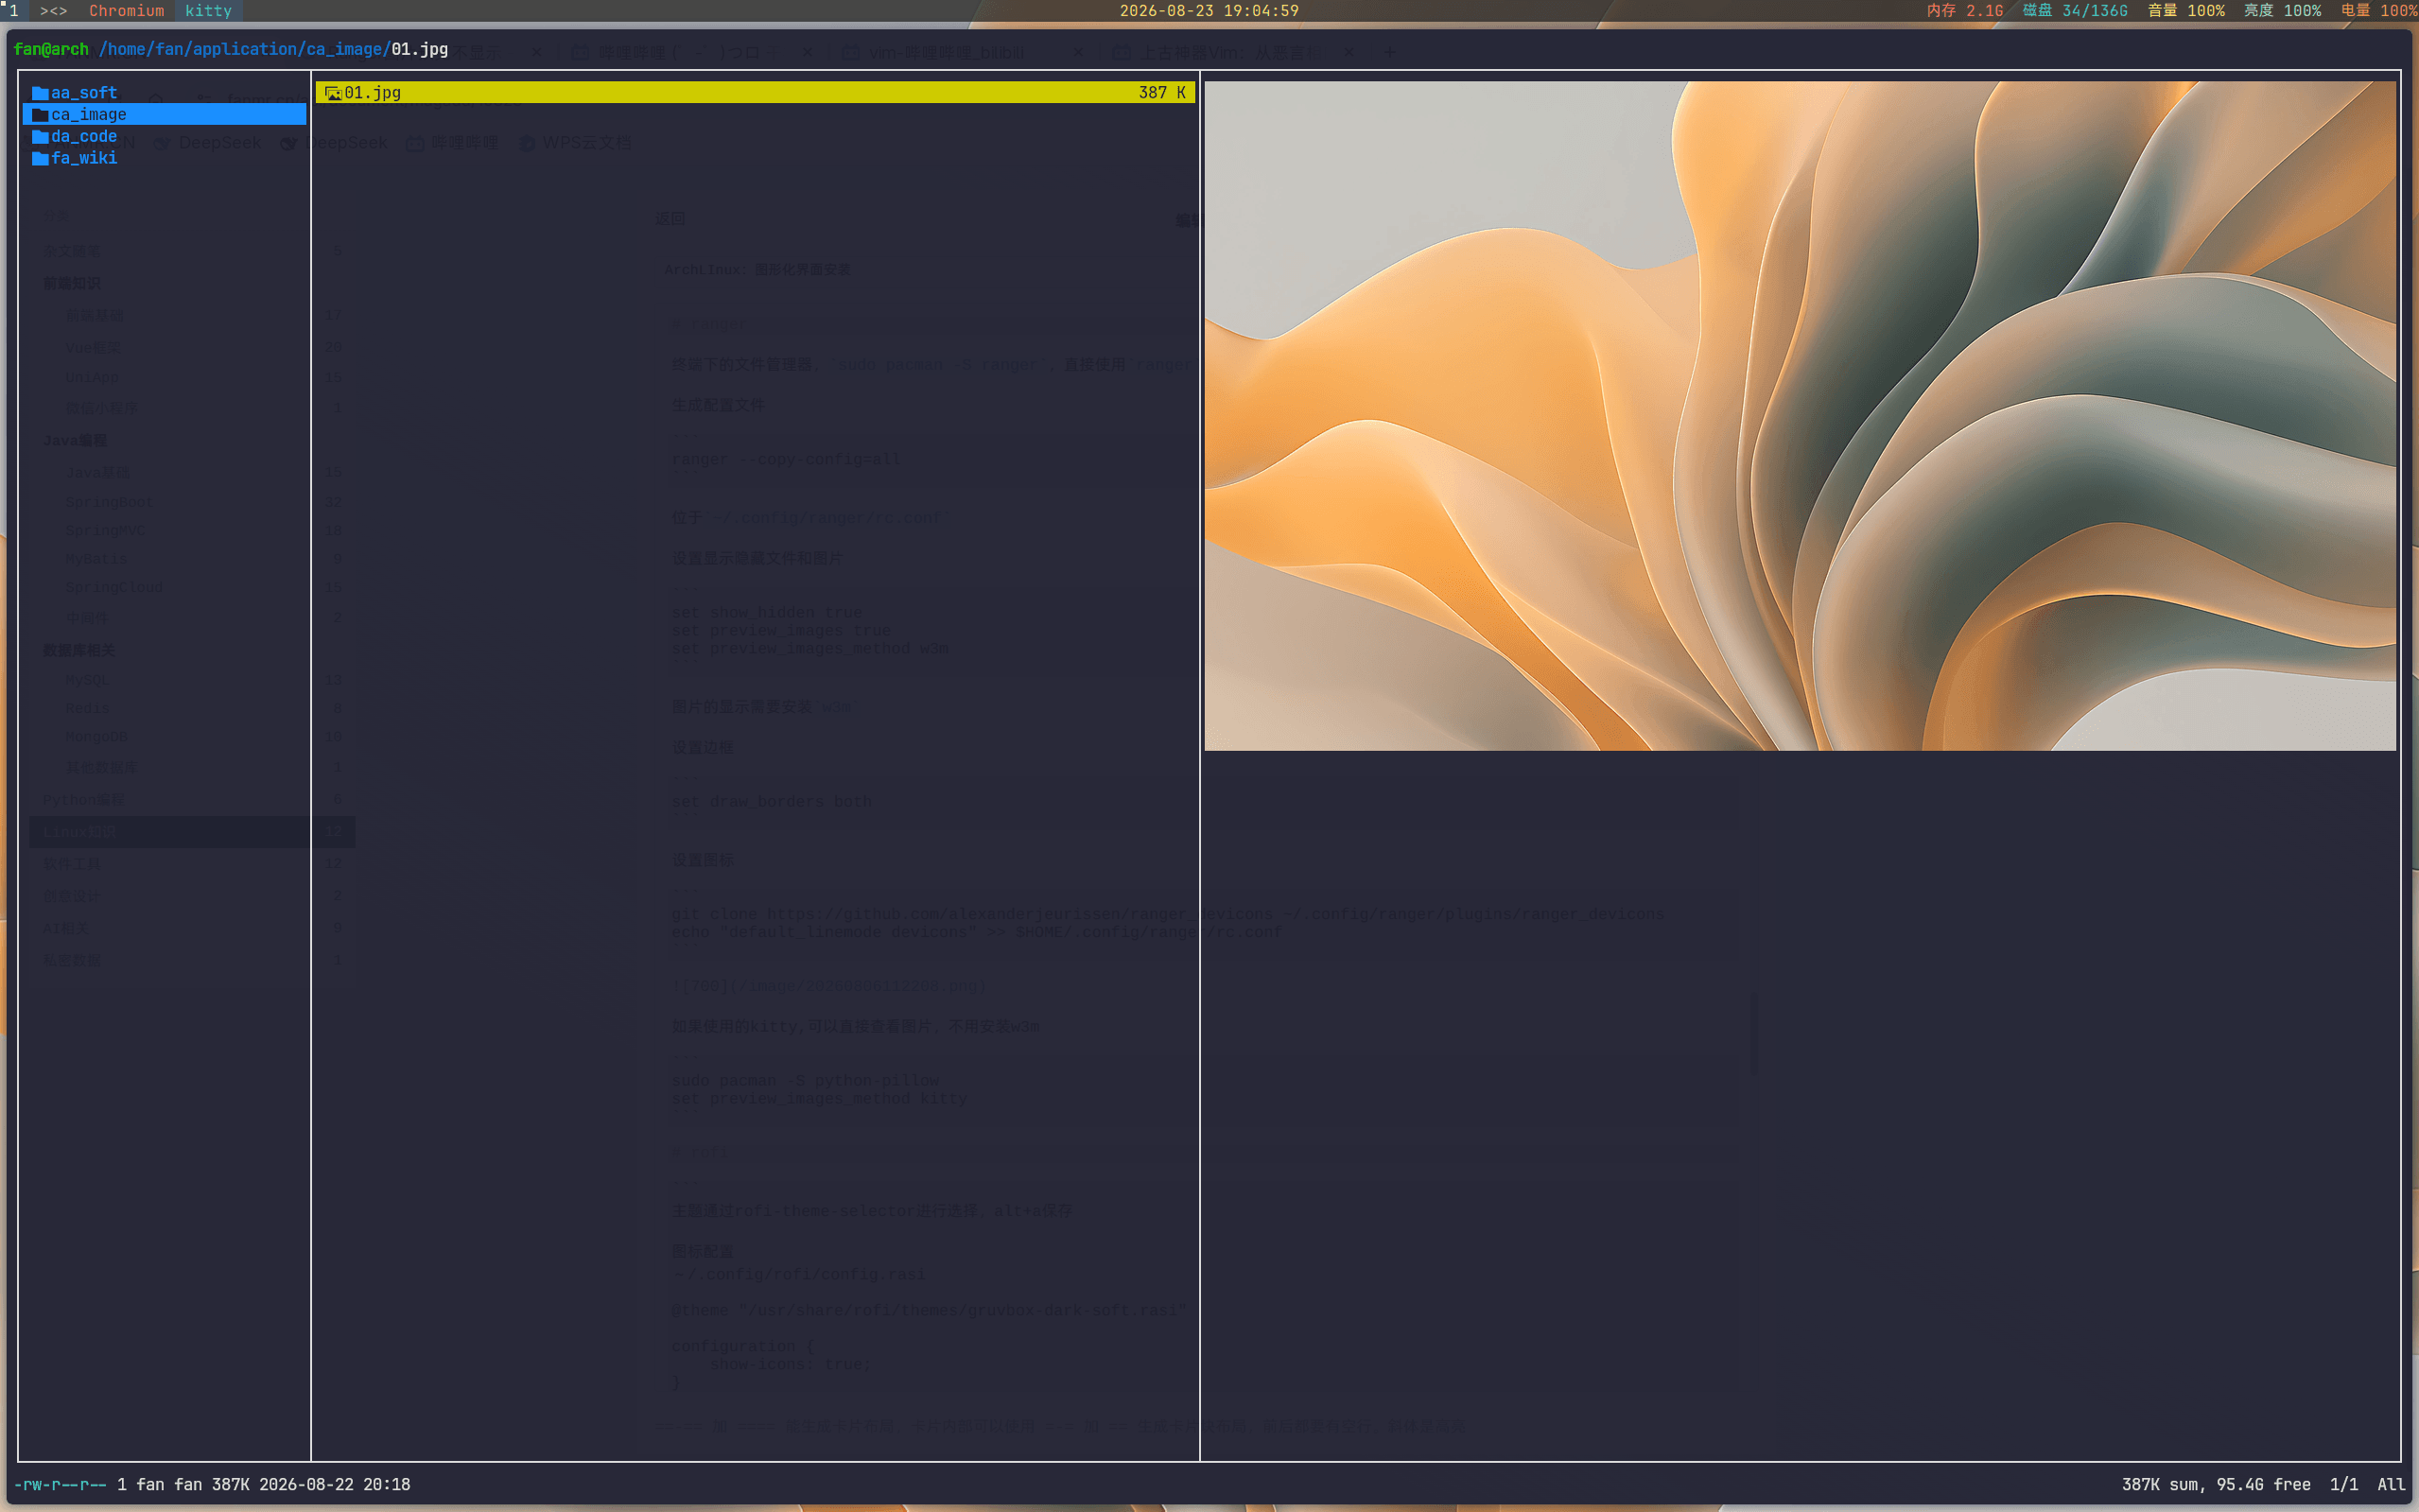
rofi
主题通过rofi-theme-selector进行选择,alt+a保存

图标配置
~/.config/rofi/config.rasi

@theme "/usr/share/rofi/themes/gruvbox-dark-soft.rasi"

configuration {
    show-icons: true;
}
个人主题配置
mkdir -p ~/.local/share/rofi/themes/
cd ~/.local/share/rofi/themes/
vim rounded-common.rasi
/* ROUNDED THEME FOR ROFI */
/* Author: Newman Sanchez (https://github.com/newmanls) */

* {
    font:   "Roboto 12";

    background-color:   transparent;
    text-color:         @fg0;

    margin:     0px;
    padding:    0px;
    spacing:    0px;
}

window {
    location:       north;
    y-offset:       calc(50% - 300px);
    width:          600;
    border-radius:  4px;

    background-color:   @bg0;
}

mainbox {
    padding:    24px;
}

inputbar {
    background-color:   @bg1;
    border-color:       @bg3;

    border:         2px;
    border-radius:  16px;

    padding:    8px 16px;
    spacing:    8px;
    children:   [ prompt, entry ];
}

prompt {
    text-color: @fg2;
}

entry {
    placeholder:        "Search";
    placeholder-color:  @fg3;
}

message {
    margin:             12px 0 0;
    border-radius:      16px;
    border-color:       @bg2;
    background-color:   @bg2;
}

textbox {
    padding:    8px 24px;
}

listview {
    background-color:   transparent;

    margin:     12px 0 0;
    lines:      8;
    columns:    1;

    fixed-height: false;
}

element {
    padding:        8px 16px;
    spacing:        8px;
    border-radius:  16px;
}

element normal active {
    text-color: @bg3;
}

element alternate active {
    text-color: @bg3;
}

element selected normal, element selected active {
    background-color:   @bg3;
}

element-icon {
    size:           1em;
    vertical-align: 0.5;
}

element-text {
    text-color: inherit;
}
vim rounded-nord-dark.rasi
/* ROUNDED THEME FOR ROFI */
/* Author: Newman Sanchez (https://github.com/newmanls) */

* {
    bg0:    #2E3440F2;
    bg1:    #3B4252;
    bg2:    #4C566A80;
    bg3:    #88C0D0F2;
    fg0:    #D8DEE9;
    fg1:    #ECEFF4;
    fg2:    #D8DEE9;
    fg3:    #4C566A;
}

@import "rounded-common.rasi"

element selected {
    text-color: @bg1;
}然后运行rofi-theme-selector,找到对应的主题rounded-nerd-dark设置即可
双系统时间问题
根本原因是:
- Windows:默认把硬件时钟当作本地时间(Local Time)
- Linux(Arch):默认把硬件时钟当作UTC时间
这就导致两个系统看到的时间总有一个是错的,方案是让 Windows 使用 UTC,在 Windows 下以管理员身份运行 CMD 或 PowerShell
# 让 Windows 使用 UTC 时间
reg add "HKEY_LOCAL_MACHINE\System\CurrentControlSet\Control\TimeZoneInformation" /v RealTimeIsUniversal /t REG_DWORD /d 1 /f

Reg add HKLM\SYSTEM\CurrentControlSet\Control\TimeZoneInformation /v RealTimeIsUniversal /t REG_DWORD /d 1
fish
shell
sudo pacman -S fish
chsh -s /usr/bin/fish关闭欢迎词,编辑~/.config/fish/config.fish,最后位置加入
set -gx fish_greeting ""

# 添加别名
alias ll="ls -al"

# 让 prompt_pwd 显示完整目录名(不缩短)
set -gx fish_prompt_pwd_dir_length 0
kitty
终端
sudo pacman -S kitty配置文件vim ~/.config/kitty/kitty.conf
# 隐藏标题
hide_window_decorations titlebar-only

# 背景透明度
background_opacity 1
# 允许动态调整透明度(需要设置为 yes)
dynamic_background_opacity yes
# 背景模糊程度(需要 background_opacity < 1)
background_blur 20

# 窗口内边距
window_padding_width 4

# 设置背景色为深灰色
background #1e1e2e

# 滚动条宽度
scrollbar_width 0

# 设置背景图片路径
# background_image /path/to/your/image.png
# 图片布局: tiled(平铺), scaled(拉伸), centered(居中), cscaled(保持比例缩放)
# background_image_layout scaled
# 背景图片的透明度叠加(0=不叠加,1=完全叠加背景色)
# background_tint 0.3

# 开启光标拖尾效果
cursor_trail 1
# 控制拖尾的衰减速度(长度和持续时间)
cursor_trail_decay 0.1 0.4
# 或者调整拖尾颜色
cursor_trail_color #ff6b6b